|
|
2 years ago | |
|---|---|---|
| public | 2 years ago | |
| src | 2 years ago | |
| .gitignore | 2 years ago | |
| .prettierignore | 2 years ago | |
| .prettierrc | 2 years ago | |
| README.md | 2 years ago | |
| package-lock.json | 2 years ago | |
| package.json | 2 years ago | |
| tsconfig.json | 2 years ago | |
README.md
Xeven Quiz - ReactJS Quiz App Template Code Documentations
Welcome to the Code Quiz App documentation! This guide will walk you through the steps to start using and customizing the app according to your needs. The Code Quiz App is designed to help you create interactive quizzes with various question types, including Multiple Choice Questions (MCQs), Multiple Answer Questions (MAQs), and True/False questions.
Demo App
To experience the Demo App, visit the link: https://xeven-quiz.vercel.app/
How to Start a Project
To start the project, follow these steps:
- Open the terminal and navigate to the project directory.
- Run the command
npm installto download and install all the project dependencies. - Once the dependencies are installed, run the command
npm startto start the development server.
Folder Structure Explanation
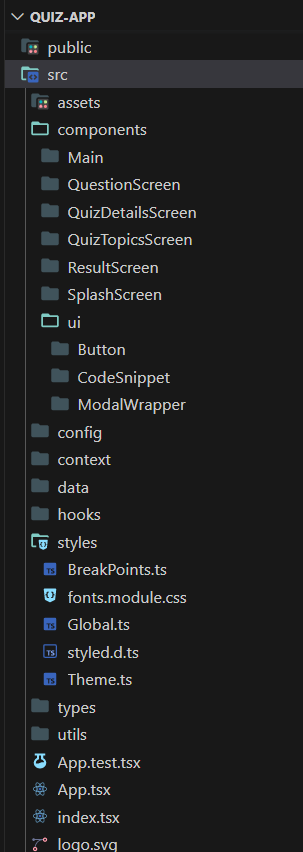
Understanding the folder structure is essential for working with the app. Here's an overview of the main folders:
- assets: Contains all the app's assets, such as fonts, icons, and images
- components: Contains all the components of app
- components/UI: Contains reusable UI components of app
- context: Includes a context for sharing logic across the app
- styles: Contains styles and their configurations using Styled Components
- hooks: Includes reusable hooks used in the app
- utils: Contains Javascript helper functions
- data: Contains quiz questions and quiz topic screens data
- types: Contains TypeScript types used throughout the app
- config: Imports all the icons, providing centralized access
Components Architecture
The Xeven Quiz App consists of 5 main screens/components that are displayed conditionally:
- Splash Screen
- Quiz Topics Screen
- Quiz Details Screen
- Questions Screen
- Result Screen
The screens are organized in the components folder since the app does not utilize routing. If a component is reusable and can be used in multiple places within the app (e.g., Button, ModalWrapper, and CodeSnippet), it is placed in the components/UI folder. On the other hand, if a component is screen-specific and separated just to make other components smaller and more manageable, it is placed in the relevant components folder. For example, the components **QuizHeader**, **Question**, and **Answer** are inside the QuestionScreen folder.
How to customize the quiz layout and styling
Changing the App Theme
To change the theme of the app, follow these steps:
- Open the
styles/Themesfile. - Modify the colors in the themes to customize the app's appearance.
Changing the App Font
To change the font of the app, follow these steps:
- Go to
assets⇒fonts. - Replace the current fonts (e.g., "anek-malayalam") with the fonts you want to use.
- Go to
fonts.module.cssfile ****and replace the font name and path with new font you added. - Go to the
themefile and change the font name. - Go to the global styles and update the font in the
bodysection.
Modifying the Quiz Topic Screen or Adding New Categories
To modify the Quiz Topics Screen or add new categories of topics/icons, follow these steps:
- Open the
data/quizTopicsfile. - Make changes to the titles, icons or add new topics (by adding new object in
quizTopics) as needed. - Ensure that the title in the
QuizTopicdata match the topic ofdata/QuizQuestionsfolder.
For example
export const quizTopics: QuizTopic[] = [
  {
    title: 'React', // match topic value with this line
    icon: <ReactIcon />,
  },
  {
    title: 'JavaScript', // match topic value with this line
    icon: <JavaScript />,
  },
  ....
]

export const javascript: Topic = {
  topic: 'Javascript', // match value with topic key
  level: 'Beginner',
  totalQuestions: 14,
  .....
}
Adding a New Screen
This app is designed with scalability in mind, allowing you to easily add new screens. Here's how you can add a new screen, such as a "Quiz Types" screen (where you can select quiz type for example individual question timer, with or without timer):
Step 1: Create a component
Create a new component called QuizType in the components folder.
Step 2: Update the Main component
Go to the main components file (Main/index.ts) and render the QuizType screen in the screenComponents section/object. Don't forget to add the screen name in the typescript screenTypes as well.
const screenComponents = {
  [ScreenTypes.SplashScreen]: <SplashScreen />,
  [ScreenTypes.QuizTopicsScreen]: <QuizTopicsScreen />,
  [ScreenTypes.QuizTypesScreen]: <QuizTypesScreen />, // new screen
  [ScreenTypes.QuizDetailsScreen]: <QuizDetailsScreen />,
  [ScreenTypes.QuestionScreen]: <QuestionScreen />,
  [ScreenTypes.ResultScreen]: <ResultScreen />,
}
If you have multiple conditions to show the screen, you can change the object to a switch or if-else statement. Here's an example using a switch statement:
import { useEffect } from 'react'

import { useQuiz } from '../../context/QuizContext'
import { ScreenTypes } from '../../types'

import QuestionScreen from '../QuestionScreen'
import QuizDetailsScreen from '../QuizDetailsScreen'
import QuizTopicsScreen from '../QuizTopicsScreen'
import ResultScreen from '../ResultScreen'
import SplashScreen from '../SplashScreen'

function Main() {
  const { currentScreen, setCurrentScreen } = useQuiz()

  useEffect(() => {
    setTimeout(() => {
      setCurrentScreen(ScreenTypes.QuizTopicsScreen)
    }, 1000)
  }, [])

  switch (currentScreen) {
    case ScreenTypes.SplashScreen:
      return <SplashScreen />
    case ScreenTypes.QuizTopicsScreen:
      return <QuizTopicsScreen />
    case ScreenTypes.QuizDetailsScreen:
      return <QuizDetailsScreen />
    case ScreenTypes.QuestionScreen:
      return <QuestionScreen />
    case ScreenTypes.ResultScreen:
      return <ResultScreen />
    default:
      return <SplashScreen />
  }
}

export default Main
How to Add Code Snippets in Questions
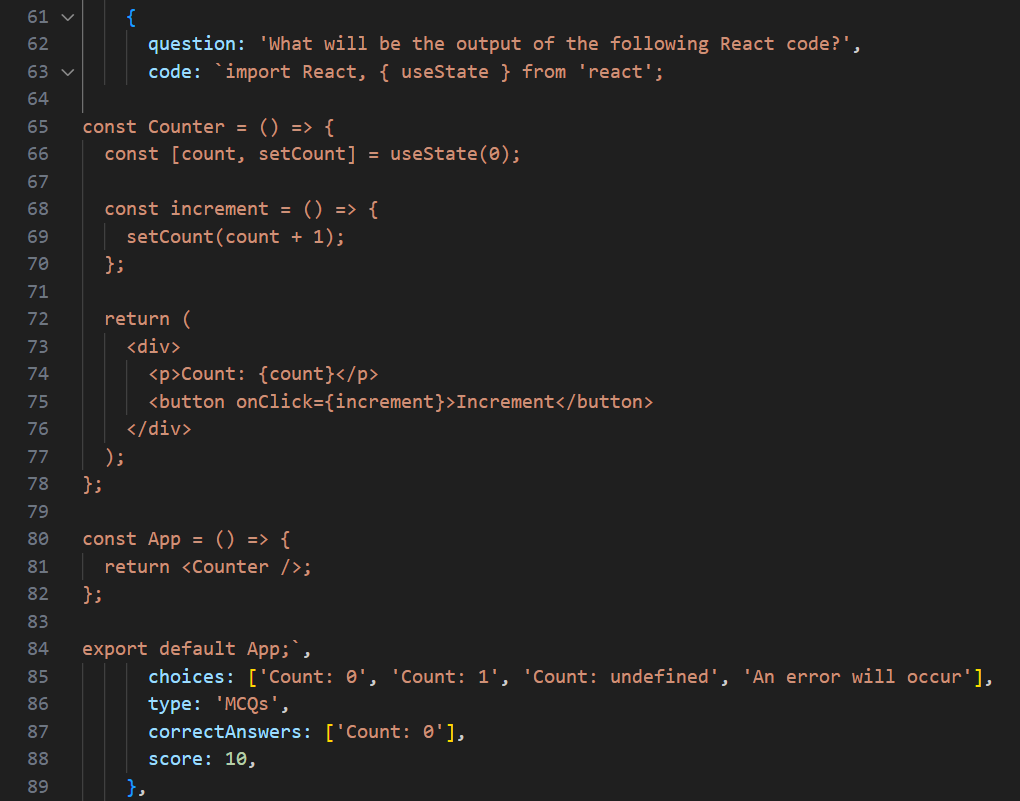
Each question supports a code key, which is conditionally shown only if the question contains a code snippet.
How to format code snippet
In the Xeven Quiz App, code snippets are pieces of code represented as text. To make them look nice and readable, we use an npm package called prismjs. This tool highlights the code with different colors so that it stands out and is easy to understand.
To display code correctly, we need to pay attention to the spaces and how the code is structured, just like we do with the existing questions. This way, the code will appear neatly formatted and will be easier for users to read and comprehend.
Here's an example image to illustrate the correct format for displaying code snippets:
Implementing Different Types of Quiz Questions
The Code Quiz App supports various types of quiz questions, including Multiple Choice Questions (MCQs), Multiple Answer Questions (MAQs), and True/False questions. To add different question types, you can modify the question components and their associated data structures. You can refer to the existing question formats in the data/QuizQuestions folder as examples when creating new questions.
For example, if you want to create a Multiple Choice Question (MCQ), you need to set its type to MCQs in the question data. Similarly, for a Multiple Answer Question (MAQ), set the type to MAQs, and for a True/False question, set it to the appropriate type as well.
Remember: For MAQs, users can select multiple answer options, while for MCQs and True/False questions, users can select only one option. Make sure to set the correct type to match the question's behavior accordingly.
Important Note
Before making the Code Quiz App your own, remember to customize the meta and title tags in the index.html file, as well as the logo, preview image, and favicon image in the public folder. This ensures that the app reflects your branding and identity.
Deploying the Quiz App to a Production Environment
To share your quiz app with the world, you need to deploy it on a server that supports single-page applications or the React ecosystem. Here are some popular options for deploying your app:
- Digital Ocean
- Vercel
- Netlify
- AWS Amplify
Choose the one that best suits your needs and follow their deployment instructions to make your app accessible to users.
What to expect in next update?
The next app update, scheduled for September 2023, will bring exciting new features and improvements:
- Dark mode support.
- Image support in Quiz Questions.
- Faster Typography with Typography Styled components
I hope this documentation helps you get started with the Xeven Quiz App. If you have any questions or feedback, please feel free to reach out to me at abdul_basit313@outlook.com. Happy quizzing!

